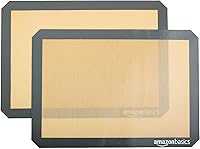
How to Use Silicone Bakeware in the Oven
Use silicone bakeware in the oven on a firm support pan, stay within its temperature limit, and check that food is fully baked before removing the flexible mold. Let the bakeware cool before handling it.
On this page (10 sections)
- How do you use silicone bakeware in the oven?
- Why does silicone bakeware need a support pan?
- How full should silicone bakeware be?
- How do you check the oven temperature and baking time?
- Which loaf pans help with oven baking?
- How do you release food from silicone bakeware?
- How do you clean and store silicone bakeware?
- Can silicone bakeware go in the microwave?
- What should you avoid with silicone bakeware?
- What is the safest way to use silicone bakeware in the oven?
Use silicone bakeware in the oven on a firm support pan, within the mold's temperature limit, and with careful handling before and after baking. Flexible silicone molds are easy to spill when full, so support them before adding batter and keep them level as you move them.
Silicone bakeware can suit cakes, muffins, breads, and other oven recipes, but it does not behave exactly like metal. For another oven baking method, see the pizza stone oven guide.
The flexible sides need support, and the bake time may differ from the time used for a metal pan.
How do you use silicone bakeware in the oven?
Place the empty silicone mold on a rigid baking sheet before filling it. Add the batter while the mold is supported, then move the sheet and mold together into the oven.
Follow these steps:
- Check the mold for cuts, tears, or a damaged surface.
- Read the temperature limit and care instructions.
- Set the empty mold on a firm baking sheet.
- Grease it lightly if the recipe or mold instructions call for it.
- Fill it without passing the mold's recommended fill level.
- Carry the support pan with both hands.
- Bake until the center is fully set.
- Cool the mold before turning out the food.
Do not lift a full, unsupported silicone mold by one corner. The sides can flex, which may spill batter or change the shape of the finished food.
For a wider look at choosing pans, see this guide to bakeware sets.
Why does silicone bakeware need a support pan?
A support pan keeps a flexible mold level while you fill, carry, and remove it. This matters most for liquid batter, tall cakes, loaf recipes, and molds with wide openings.
Choose a support pan that is larger than the silicone mold but still fits comfortably on the oven rack. Leave space around the pan so heat can circulate and the oven door can close without touching the bakeware.
A flat baking sheet is useful for shallow molds. A deeper metal pan can support a loaf or cake mold if it does not block the mold's sides or make removal awkward.
Which support pan works for oven baking?
A rigid steel baking sheet gives flexible bakeware a stable base. The GoodCook Everyday Nonstick Baking Sheet Set includes 13 x 9 in, 15 x 10 in, and 17 x 11 in carbon steel sheets, so the 3 sizes can suit different mold footprints.
Choose the sheet that supports the mold without forcing it against the edges. The set has scratch-resistant nonstick coating and is dishwasher safe, though hand washing is recommended for longer use.
A sheet with low sides is useful for moving a mold in and out of the oven. Check the mold's base size first, since a pan that is too small will not provide reliable support.
How full should silicone bakeware be?
Fill silicone bakeware only to the level recommended by the recipe or mold instructions. Leave room for rising, especially with cakes, quick breads, and yeast dough.
Use a spoon, ladle, or measuring cup to add batter while the mold sits on its support pan. Wipe spills from the outside before baking so they do not harden onto the oven surface.
Flexible sides can make the fill line harder to judge. Set the mold on a level counter, divide batter evenly, and avoid carrying it across the kitchen after filling.
For loaf recipes, match the pan to the recipe volume. A pan that is too small may overflow, while a pan that is too large can produce a shorter loaf that bakes faster.
How do you check the oven temperature and baking time?
Use the mold's stated temperature limit and check the food for doneness rather than relying only on the metal-pan timing. Silicone can change how quickly the sides heat, so the recipe's suggested time may need a careful check near the end.
An oven thermometer can help if your oven runs hot or cool, but the bakeware instructions still control the safe limit. Do not place silicone bakeware under a broiler unless the manufacturer specifically allows it.
Check cakes and breads in the center with a suitable tester. Look for a set center, an evenly baked surface, and the doneness signs required by the recipe.
Do not remove a tall bake from the oven by pulling on the silicone sides. Slide the support pan onto a heat-safe surface first, then let the mold cool.
Which loaf pans help with oven baking?
A rigid metal loaf pan may be the better choice when you want firm sides, a defined shape, and easy movement from counter to oven. The USA Pan Bakeware Pullman Loaf Pan measures 9 x 4 x 4 in, includes a cover, and uses aluminized steel with a nonstick silicone coating.
The cover is suited to recipes where a flat-topped loaf shape is desired. Its rectangular form and firm steel construction also avoid the support issue that comes with a flexible silicone loaf mold.
Hand wash it with hot water, mild soap, and a gentle scrub brush or sponge. The coating is PTFE, PFOA, and BPA free according to USA Pan's product information.
For a standard loaf shape, the USA Pan Nonstick Standard Bread Loaf Pan measures 8.5 x 4.5 x 2.75 in and has a 1 lb size. It uses aluminized steel, a corrugated surface, and a proprietary silicone nonstick coating.
This firm pan suits readers who want a conventional loaf shape without handling a flexible mold. Hand wash it with hot water, mild soap, and a gentle scrub brush or sponge.
If you are comparing shapes, see bundt pan sizes before choosing a mold for a specific recipe. A detailed Bundt shape may need extra care during release.
How do you release food from silicone bakeware?
Let the bake cool until it is firm, then loosen the edges and turn the mold out slowly. Warm food can break apart when the flexible sides are pulled too quickly.
For a cake pan with removable sides, see how to use a springform cake pan.
Place a cooling rack or plate over the mold, hold both together, and invert them in one controlled motion. Gently peel the silicone away from the food instead of tugging the food out by its top.
For detailed molds, loosen the widest edges first. If the food resists, stop and let it cool longer.
A silicone spatula or wooden tool can help with an edge, but avoid knives and metal picks.
Some recipes release better after a short rest in the mold. Follow the recipe's cooling instructions, especially for cakes, custards, and delicate breads.
How do you clean and store silicone bakeware?
Wash silicone bakeware with warm water and mild dish soap, then dry it fully before storage. Greasy recipes may need a soft sponge and a second rinse.
Do not use abrasive pads, sharp scrapers, or metal tools that can cut the surface. Check the mold after washing for tears, sticky residue, or a change in shape.
Store molds flat when possible. If you roll or fold them, avoid tight creases that could make the mold sit unevenly the next time you bake.
Silicone can hold onto odors from strongly flavored foods. Wash it promptly, rinse well, and let it air-dry before placing it in a cabinet.
Can silicone bakeware go in the microwave?
Silicone bakeware may be suitable for microwave use, but the oven and microwave rules are not automatically the same. Check the instructions for the specific mold and follow the cooking limits for the appliance.
Our guide to can you microwave silicone bakeware explains the checks to make before using a silicone mold in a microwave. Never use a mold in an appliance or setting that its instructions exclude.
For more buying context, compare a best silicone bakeware set with the specific mold sizes you use most. Readers considering Trudeau products can also see best Trudeau silicone bakeware.
What should you avoid with silicone bakeware?
Avoid these common mistakes:
- Filling the mold before placing it on a support pan.
- Exceeding the mold's temperature limit.
- Using a knife to release stuck food.
- Moving a full mold with one hand.
- Placing silicone under a broiler without clear approval.
- Cutting food while it is still inside the mold.
- Storing the mold while it is damp or greasy.
Silicone is flexible, but it is not damage-proof. Treat it as a shaped baking surface that needs support and careful release.
Do not use unrelated cookware as a substitute for the mold's instructions. For example, What Is the Difference Between a Stockpot and a Dutch Oven? covers different cookware jobs and does not replace guidance for oven bakeware.
If you use divided brownie molds, how to use a brownie pan with dividers explains the support and release issues specific to that shape. For metal baking sheets, see nordic ware stainless steel baking sheet before comparing materials.
What is the safest way to use silicone bakeware in the oven?
For how to use silicone bakeware in the oven, support the mold on a rigid pan, check its temperature limit, fill it carefully, and cool the food before release. These steps address the main risks: spills, overfilling, heat damage, and broken food.
Choose silicone for flexible shapes and easy release when the mold suits your recipe. Choose the USA Pan loaf pans when firm sides and simple movement matter more, or choose the GoodCook set when you need several support-pan sizes.
Frequently asked questions
Can silicone bakeware go directly on the oven rack?
It can, if the bakeware's instructions allow it, but a firm baking sheet is safer for flexible molds filled with batter. The support makes the mold easier to carry and helps prevent spills.
Check the silicone bakeware's temperature limit before heating it.
Do you need to grease silicone bakeware?
Greasing is often optional with silicone bakeware, but a light coating can help with sticky recipes and detailed shapes. Use the care instructions for your mold, avoid sharp tools, and let the food cool before turning it out.
What temperature is safe for silicone bakeware?
The safe temperature depends on the specific mold, so check its instructions or manufacturer guidance before use. Do not assume every silicone mold has the same limit.
Use a firm pan underneath and stop using the mold if it becomes damaged.
How do you remove baked food from silicone bakeware?
Cool the food until it is firm enough to handle, then gently pull the silicone away from the edges and invert the mold over a plate or rack. If food sticks, loosen one edge with a silicone or wooden tool instead of a knife.